OPTASY: Drupal Web Development Agency Toronto
(416) 243-2431Drupal SupportRequest A QuoteQuote

Main navigation

  • Home
  • Services
    • Digital Strategy
    • Design
    • Web Development
      • Drupal
      • WordPress
      • Magento
      • Laravel
      • Shopify
      • Sharepoint
      • Contentful
      • Gatsby
      • Next.js
      • Node.js
      • React
      • AngularJS
    • Mobile & App
      • IOS
      • Android
      • Augmented Reality
      • Artificial Intelligence
      • Virtual Reality
    • Maintenance & Support
      • Drupal Maintenance
      • Wordpress Maintenance
    • Staff Augmentation
  • Portfolio
    • Web
    • Mobile
    • Ar
  • About
    • Who we are
    • Values
    • Events
    • Awards
    • News
    • Careers
    • Partners
      • Acquia
      • Google
      • Pantheon
      • Shopify
      • Wordpress
  • Blog
    • Drupal
    • Drupal 8
    • HTML
    • CSS
    • Javascript
    • PHP
    • Microsoft
    • Web Design
    • Design
    • Tips
    • News
  • Contact
(416) 243-2431 Drupal Support Request A QuoteQuote

In light of the recent COVID-19 pandemic - OPTASY would like to offer DRUPAL website support for any Healthcare, Government, Education and Non-Profit Organization(s) with critical crisis communication websites or organizations directly providing relief. Stay Safe and Stay Well.

How to Set Up Google Analytics on Your Drupal Site: A Dead-Simple Step-by-Step Guide
Drupal
Drupal 8
Tips

How to Set Up Google Analytics on Your Drupal Site: A Dead-Simple Step-by-Step Guide

by Adriana Cacoveanu on Apr 05 2018

Who are your visitors? Where do they come from? And what do they do precisely during their visits on your Drupal site? How long are their visits? What content on your site do they linger on and what content do they “stubbornly” ignore? Needless to say that for getting your answers to all these questions you need to set up Google Analytics on your website.

Since:

“This data--aka analytics--is the lifeblood of the digital marketer.” (Jeffrey Mcguire, Acquia, Inc. Evangelist)

The good news is that integrating it is nothing but a quick and simple 3-step process. And the great news is that:

Drupal's got you covered with its dedicated Google Analytics module, geared at simplifying the otherwise tedious and time-consuming process.

So, shall we dive into the installation guide?


1. But First: Why Web Analytics? And Why Precisely Google Analytics?

In an UX-dominated digital reality, that takes personalization to a whole new level, user behavior data turns into... superpower.

And by “user behavior data”, I do mean web analytics.

Therefore, injecting a web analytics service into your Drupal site is like... injecting true power into its “veins”.

But why precisely Google Analytics?

Why set up Google Analytics on your Drupal site instead of another web analytics tracking tool? Is its popularity a strong enough reason for you to jump on the trend?

To answer your question, I do think that its own key features make the best answers:


  • audience demographic reporting: discover where your site visitors come from, their native languages, the devices and operating systems they use for accessing your website...
  • goal tracking: monitor conversion rates, downloads, sales and pretty much all stats showing how close (or far) you are to reaching the goals that you've set for your website
  • acquisition reporting: identify your site's traffic sources; where do your visitors come from exactly?
  • on-site reporting: gain a deep insight into the way visitors engage with specific pieces of content on your website, so you know how to adjust the experience your deliver them on your site/app to their specific needs 
  • event-tracking: tap into this feature for measuring all activities carried out on your Drupal site


And the list of features could go on and on. Providing you with a high-level dashboard and enabling you to go as deep as you need to with your “data digging”.

For Google Analytics is only as powerful as you “allow” it to be. It empowers you to dig up both surface and “in-depth data”.

Moreover (or better said: “thanks to...”), being such a feature-rich tracking tool, Google Analytics's highly versatile, too. From email marketing to social media marketing, to any type of marketing campaign that you plan to launch, it's built to fit in just perfectly.

To power all forms of marketing strategies.

And where do you add that it's been a while now since we've been having Google Analytics for mobile apps and the Google Analytics 360 suite, too! 2 more powerful GA tools to add to your web analytics “tracking arsenal”.


2. The Drupal Google Analytics Module and How It Will Make Your Life (So Much) Easier

Let me try a lucky guess: 

Your Drupal site has... X pages (have I guessed it?)

The “standard” way to add Google Analytics to your Drupal site would involve:

Copying the tracking ID that Google Analytics provides you with and pasting it on each and every page on your website.

A hair-pulling monotonous and time-consuming process, don't you think?

And it starts to look even more cumbersome if you think that you have the alternative to set up Google Analytics on your Drupal site using the dedicated module.

But how does it streamline... everything more exactly? 

You'll just need to paste that Google Analytics javascript snippet for tracking data right to this module's Configuration page and... that's it!

The module will take it from there! It will distribute it itself to all the pages on your website.

Less effort, less time wasted for carrying out in a tedious and repetitive activity. And more time left for customizing all those statistics features to perfectly suit your goals and your site's needs.
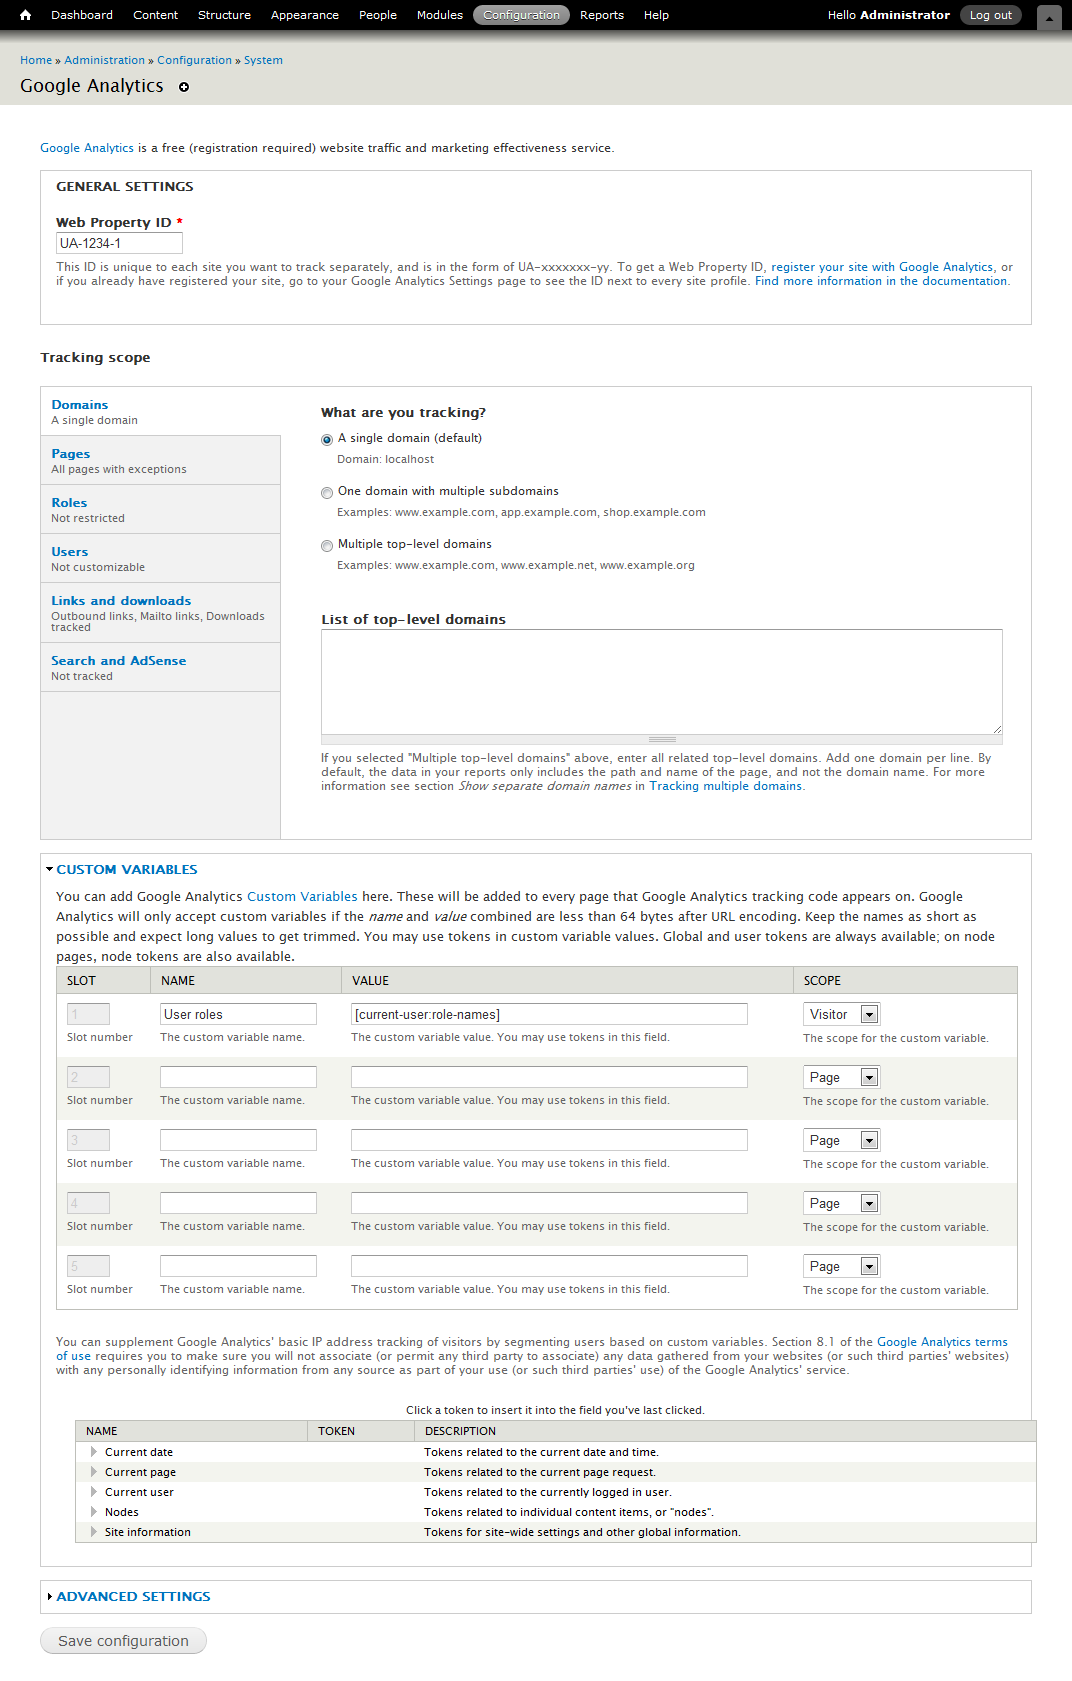
How to Set Up Google Analytics on Your Drupal Site: The Google Analytics Drupal Module

Luckily enough, the Drupal Google Analytics module puts an admin-friendly UI at your disposal precisely for that:


  • use it to track down key data 
  • use it for tailoring your web analytics-tracking activity to your needs: by user role, by pages etc.


3. Set Up Google Analytics on Your Drupal Site In Just 3 Simple Steps 

As promised, here's a “dead-simple 3-step guide on how to add Google Analytics to your Drupal site (“leveraging the power of the dedicated Drupal module here included”)


Step 1

The very first thing you'll need to do is sign up for a Google Analytics account if you don't have one already. And then to add your Drupal site (obviously!).

And here are the quick steps to take:


  1. go to www.google.com/analytics
  2. hit “sign in” (you'll find it in the top right corner) and select “Google Analytics” from the unfolding drop-down menu
  3. click “Sign Up” and just follow the given steps for setting up your new account
  4. next, follow the instructions for setting up web tracking


Now you should be able to see your Drupal site displayed under your account, on your admin page in Google Analytics.

And it's now that you should be able to retrieve your site's “Tracking ID”, as well. You'll find it in the “Property Setting” section.


Step 2

The next major step to take as you set up Google Analytics on your Drupal site is to actually go back to your site and... install THE module itself.

Since I've already praised its “superpowers” and how they “conspire” to make your life easier, I'm not going to point them out once again.

Instead, I'll go straight to the steps to take once you've enabled the module on your website:


  1. access its configuration page (you'll find the “Configuration” tab on top of the page, “flanked by” the “Modules” and the “Reports” tabs)
  2. there, right under the “General Setting” section, just enter your “Web Property ID”
  3. … which is precisely the Google Analytics tracking code that you've just retrieved at Step 1


And this is precisely the “magic trick” that's going to add the Google Analytics tracking system site-wide. A monotonous, multiple-step process turned into a one-step operation.

This thanks to the Drupal Google Analytics module!


Step 3

Here you are now, ready to save your settings and to officially harness the power of Google Analytics on your website!

Normally you should be just fine with the default settings that the service provides you with, right out-of-the-box.

Yet, if you need to “refine” your searches, your entire tracking activity, feel free to do that. To explore all the options stored in the “Tracking Scope” tabs for you.

Speaking of which, let me give you just a few examples of how deep you could narrow down your “investigations” and customize the modules:


  • roles: a setting which lets you define which user roles to track (and which roles the system should ignore)
  • domains: indicate whether it's a single or multiple domains that you need monitoring
  • privacy: it enables you to make visitors' IP addresses anonymous
  • pages: indicate precisely which pages on your website you need to track
  • messages: track and monitor the messages displayed to your site visitors
  • search and advertising: keep track of your internal site searches and AdSense advertisements; do keep in mind, though, that some additional settings might be needed!


And... more! You actually get even more power for configuring your JavaScript setting and adding custom variables.

The END! This is how you set up Google Analytics on your Drupal site in 3 dead-simple steps, a streamlined process powered by the dedicated Drupal module.

Share the article

Development

We do Web development

Go to our Web development page!

Visit page!

Do you want a website

or app developed?


Get a Free Quote

and let's make it work!

Get a Quote

Recommended Stories

DrupalTips
Top Drupal Debugging Techniques

Top Drupal Debugging Techniques

  Debugging is an essential part of developing any website, and Drupal is no exception. Debugging in Drupal can be a complex process due to the complexity of the system and its many components. However, with the right techniques, it is possible to identify and resolve issues quickly. In this article, we will discuss some of the top debugging techniques for Drupal that can help you troubleshoot your website more efficiently. We will cover topics such as using the Devel module, using Xdebug, and other helpful tips and tricks. With these techniques in hand, you'll be able to recognize and repair any problems on your Drupal site quickly.     Using the Devel Module for Debugging The Devel module is a powerful tool for debugging Drupal websites. It provides a suite of tools to help you quickly identify and resolve issues. The Devel module includes features such as the ability to view database queries, generate dummy content, and debug PHP code. It also has an API that allows developers to create custom debugging tools. Using the Devel module can be helpful when trying to identify the source of an issue. It can also be used to generate dummy content for testing purposes.     Utilizing Xdebug for Troubleshooting Xdebug is a powerful debugging tool that can be used to troubleshoot issues on Drupal websites. It provides detailed information about the code execution, including stack traces and variable values. This can help developers quickly identify the source of an issue and resolve it more efficiently. Xdebug also has features such as breakpoints, which allow developers to pause the execution of code at certain points to inspect the application's state. This can be helpful when trying to identify and fix complex issues.     Leveraging Drupal's Logging System Drupal's logging system is a powerful tool for debugging websites. It provides detailed information about the events that occur on the website, including errors and warnings. This can be helpful when trying to identify the source of an issue. The logging system also allows developers to set up custom log levels, which can be used to filter out unnecessary information and focus on specific types of events. This can help developers quickly identify and resolve issues.   Using the Drupal Console for Debugging The Drupal Console is a command-line interface that can be used to debug Drupal websites. It provides commands for inspecting the database, generating dummy content, and running tests. This can be helpful when trying to identify and fix issues quickly. The Drupal Console also has an API that allows developers to create custom commands for debugging purposes.   Have You Completed Your Drupal 10 Migration? The release of Drupal 10 marks a major milestone for the platform, and it is important to ensure that your website is up-to-date with the latest version. Migrating to Drupal 10 can be a complex process, but it is essential for ensuring that your website remains secure and performs optimally. When migrating to Drupal 10, it is important to test the website thoroughly and use debugging techniques to identify and resolve any issues. The Devel module, Xdebug, and Drupal's logging system can all be used to troubleshoot any problems that may arise during the migration process. Don't forget to ensure that all of the modules and themes used on the website are compatible with Drupal 10. It is recommended to use the Update Status module to check for any available updates and apply them before migrating to Drupal 10. Additionally, it is a good idea to create a backup of your website before beginning the migration process in case something goes wrong. By taking these steps, you can ensure that your website is properly migrated and running smoothly on Drupal 10.     Conclusion Debugging in Drupal can be a complex process, but with the right techniques, it is possible to debug your website faster and easier. If you need more advice on your next web development project or on your Drupal 10 migration, our team of experts is here to help you. Contact us for more details.   Photo credit: Unpslash.... Read more
Raluca Olariu / Jan 16'2023
DrupalTips
Troubleshoot Your Website in 8 Easy Steps

Troubleshoot Your Website in 8 Easy Steps

  Having a website that runs smoothly is essential for any business. Unfortunately, website issues can arise from time to time and can be difficult to troubleshoot. The good news is that there are some simple steps you can take to identify and resolve common website problems. In this article, we'll discuss eight easy steps you can take to troubleshoot your website quickly and efficiently. With these tips, you'll be able to get your website back up and running in no time. 1. Check Your Server Status. The first step in troubleshooting your website is to check the status of your server. If your server is down or experiencing issues, it could be the cause of any problems you're having with your website. You can check the status of your server by accessing the control panel for your hosting provider. This will give you an overview of any issues that may be affecting your server and allow you to take the necessary steps to resolve them. 2. Review Your Website Logs. After checking your server status, your next step is to review your website logs. Logs are a great way to identify any errors or issues that may be occurring on your website. Reviewing the log files lets you pinpoint the exact source of the problem and take steps to resolve it quickly. Logs can also provide valuable insights into how visitors interact with your website, which can help you optimize your website for better performance. 3. Test Your Website Performance. The third step in troubleshooting your website is to test its performance. This can be done by using a tool such as Google PageSpeed Insights or WebPageTest. These tools will analyze your website and provide you with detailed information about its loading speed, page size, and other performance metrics. This will allow you to identify any areas of improvement that could help improve the overall performance of your website. 4. Inspect Your Code for Errors. If you've tested your website performance, your next step is to inspect your code for errors. This can be done by using a tool such as Firebug or Chrome DevTools. These tools will allow you to view your website's HTML, CSS, and JavaScript code and identify any errors that may be causing issues. Once you have identified the errors, you can take steps to fix them and ensure that your website is running smoothly. 5. Check for Broken Links. The fifth step in troubleshooting your website is to check for broken links. Broken links can cause a variety of issues, such as slow loading times and poor user experience. Various tools can help you identify any broken links on your website, such as Screaming Frog or Xenu Link Sleuth. Once you have identified the broken links, you can take steps to fix them and ensure that your website is running smoothly on all platforms, including mobile devices. 6. Ensure You Have the Latest Updates Installed. Ensuring that you have the latest updates installed is imperative if you want a highly performant website. Outdated software can cause a variety of issues, such as security vulnerabilities and compatibility problems. It's important to keep your website up-to-date with the latest versions of any software or plugins you may be using. You can check for updates by accessing the control panel for your hosting provider or by using a tool such as WP Updates Notifier. 7. Analyze Traffic Patterns to Identify Issues. You should also analyze traffic patterns to identify any issues that may be causing your website to perform poorly. Analyzing traffic patterns can help you identify any areas of your website that may be causing problems, such as slow loading times or high bounce rates. You can use tools such as Google Analytics or Hotjar to track and analyze user behavior on your website. This will allow you to identify any potential issues and take steps to resolve them. 8. Monitor Your Website Regularly. Finally, remember to monitor your website regularly, as it will allow you to identify any potential issues before they become serious problems. You can use tools such as Uptime Robot or Pingdom to monitor your website's uptime and performance. In this way, you can ensure that your website is running smoothly and that any potential issues are identified quickly so that they can be addressed promptly.   Drupal 10 for High Website Performance Drupal 10, launched last month, is the latest version of one of the most powerful content management systems that can help you achieve high website performance. Drupal 10 offers a range of features designed to improve the speed and efficiency of your website, such as caching, minification, and optimization.  Among the best features we can find: Symfony 6 compatibility. Site owners and module developers will benefit from as much Symfony 6 compatibility as possible, and Symfony 4 deprecations in Drupal 9 for Symfony 5 will be resolved. Supported solutions for rebuilding jQuery UI functionality by using either vanilla JavaScript or frameworks like React. jQuery UI components used by Drupal core will be removed. Best practices for deprecating modules. Users will be able to use a proper mechanism for naming, versioning, deprecating wrappers, etc. A 'lifecycle' - property can be used in info.yml files for themes and modules. Better decoupled developer and site builder experiences, especially for menu and URL handling. Introduction of CKEditor 5 with better authoring experience and more modern editing (replacing CKEditor 4). PHP 8.1 compatibility for Drupal 9 and Drupal 10. Theme Starterkit tools for bespoke theme creation. You can learn more about how Drupal 10 can take your website to the next level in this article. Drupal 10 Migration If you're considering migrating to Drupal 10, we can help. Optasy's team of highly skilled developers can help you migrate your website to Drupal 10 quickly and efficiently. We can also provide ongoing support and maintenance for your website, ensuring it runs smoothly and optimally. Contact us today to learn more about our Drupal 10 migration services.   Photo credit: Pixabay.... Read more
Raluca Olariu / Jan 11'2023
DrupalNews
Why You Should Choose Drupal 10 in 2023

Why You Should Choose Drupal 10 in 2023

  As technology continues to evolve, it is important for businesses to stay ahead of the curve and choose the right platform for their website. Drupal 10 was released in December 2022, and it promises to be a powerful and reliable content management system (CMS). With its advanced features, scalability, security, and flexibility, Drupal 10 is an ideal choice for businesses looking to build a modern website. In this article, we will discuss why you should choose Drupal 10 for your next web development project. Advanced Features of Drupal 10 Drupal 10 comes with a range of advanced features that make it an ideal choice for businesses looking to build a modern website. These features include: Automatic Updates: Drupal 10 offers automatic updates, so you can keep your website up-to-date without having to manually update the software. This ensures that your website is always running the latest version of Drupal and is secure from any potential security threats. Responsive Design: Drupal 10 comes with a responsive design that ensures your website looks great on any device, from desktop computers to mobile phones. This makes it easier for users to access your website from any device and helps to improve user experience. Accessibility: Drupal 10 is designed with accessibility in mind, making it easier for people with disabilities to access your website. This helps to ensure that your website is accessible to everyone, regardless of their abilities. Multilingual Support: Drupal 10 supports multiple languages, so you can easily create a multilingual website that caters to a global audience. This makes it easier for businesses to reach out to a wider range of customers and expand their customer base. SEO Optimization: Drupal 10 comes with built-in SEO optimization tools that help to improve your website’s visibility in search engine results. This makes it easier for customers to find your website and helps to increase traffic and conversions.   Scalability and Flexibility  Drupal 10 is highly scalable and flexible, making it easy to customize your website to meet your specific needs. You can easily add new features and functionality to your website without having to start from scratch. This makes it easier for businesses to keep up with changing customer demands and stay ahead of the competition. Additionally, Drupal 10 is built on a modular architecture that allows you to easily add and remove modules as needed. This makes it easy to customize your website and keep it up-to-date with the latest features.   Security Benefits Drupal 10 is built with security in mind, making it one of the most secure content management systems available. It comes with a range of security features that help to protect your website from potential threats, such as SQL injection attacks and cross-site scripting. Additionally, Drupal 10 is regularly updated with the latest security patches to ensure that your website is always secure.   Cost-Effectiveness Cost-effectiveness is another major benefit of choosing Drupal 10 for your next web development project. Drupal 10 is an open source platform, meaning that it is free to use and customize. This makes it a cost-effective solution for businesses looking to build a website without breaking the bank. Additionally, Drupal 10 comes with a range of features and functionality that can help you save time and money when building your website.   Why Choose Drupal 10 in 2023? Selecting Drupal 10 in 2023 is a great choice for businesses looking to build a website that is secure, reliable, and cost-effective. Drupal 10 offers automatic updates, responsive design, multilingual support, SEO optimization, scalability and flexibility, and security benefits.  Migrate to Drupal 10 If you’re currently using an older version of Drupal, you can easily migrate to Drupal 10. The migration process is straightforward and can be completed quickly with the help of a professional web development team like Optasy. This will ensure that your website is up-to-date and secure, so you can continue to provide customers with the best possible experience. Contact us for more information about your migration process. Learn more about Drupal 10 by reading this blog post.   Photo credit: Unsplash.... Read more
Raluca Olariu / Jan 05'2023

Browse cities

×

Toronto

WordPress Development Services in Toronto
iOS App Development Services in Toronto
Drupal Development Services in Toronto
Magento Development Services in Toronto
Laravel Development Services in Toronto

Montreal

WordPress Development Services in Montreal
iOS App Development Services in Montreal
Laravel Development Services in Montreal
Drupal Development Services in Montreal
Magento Development Services in Montreal

Vancouver

Magento Development Services in Vancouver
iOS App Development Services in Vancouver
Drupal Development Services in Vancouver
WordPress Development Services in Vancouver
Laravel Development Services in Vancouver

New York

WordPress Development Services in New York
Laravel Development Services in New York
iOS App Development Services in New York
Drupal Development Services in New York
Magento Development Services in New York

Need a new Project?

Dare us to shape and boost your idea(s)!

Start a Project

(416) 243-2431

Contact

(416) 243-2431

contact@optasy.com

Toronto Downtown

First Canadian Place,
100 King St. W. Suite 5700, Toronto

Toronto West

2275 Upper Middle
Rd. E, Suite 101
Toronto

New York

1177 Avenue of the
Americas, 5th Floor,
New York

Newsletter

Get the latest OPTASY news, tips and how-to’s on the go, right in your inbox!
OPTASY
clutch
Pantheon Premier Partner
  • Drupal 8
  • Services
  • Contact Us
  • Partners

  • Drupal
  • Google
  • Magento
  • Shopify
  • Wordpress
Facebook
Twitter
LinkedIn
Drupal
  • Cities
  • Support

© 2023 All Rights Reserved. Built with Drupal